Scale Model Building
Michael Ward
Formatted using LyX 1.4.3, and AC3D 6.2.05.
Scale Model Building
Pamphlet to explain how to build realistic models.
Online at http://www.math2learn.org/
Copyright (C) 2008,2009 Michael Ward
michaelward@sprintmail.com
Pamphlet to explain how to build realistic models.
Online at http://www.math2learn.org/
Copyright (C) 2008,2009 Michael Ward
michaelward@sprintmail.com
September 2009 - Corrections, rewording, and additions.
October 2008 - Corrections.
March 2008 - Corrections.
September 2007 - Corrections.
August 2007 - First printing.
October 2008 - Corrections.
March 2008 - Corrections.
September 2007 - Corrections.
August 2007 - First printing.
This information is free; you can redistribute it and/or modify it under the terms of the GNU General Public License as published by the Free Software Foundation; either version 2 of the License, or (at your option) any later version.
This work is distributed in the hope that it will be useful, but WITHOUT ANY WARRANTY; without even the implied warranty of MERCHANTABILITY or FITNESS FOR A PARTICULAR PURPOSE. See the GNU General Public License for more details.
To receive a copy of the GNU General Public License visit http://www.gnu.org/licenses/ or write to the Free Software Foundation, Inc., 675 Mass Ave, Cambridge, MA 02139, USA.
Preface
Building models is an enjoyable activity for many people, and for my family in particular. It lets you see up close and hold in your hands the object of your interest. The more realistic it is, the more it seems you really have captured something of the object itself. Building a model to scale helps you create a more realistic model. This pamphlet is written to help you understand how to build a scale model.
In order to understand how to build a scale model you’ll have to know how to:
- Add, subtract, multiply, and divide numbers including multidigit multiplication and division
- Form a fraction and know what it means
- Write and solve a simple equation
- Round numbers
Don’t worry if you don’t already know these things. If you are really interested you’ll be able to learn them on the way (perhaps with some help from someone who already knows them, maybe all on your own from this pamphlet or one of the references at the end of the pamphlet). If you come across something you don’t understand, try to read ahead for a page or two and see if it clears up. If not, ask someone.
My hope is that after reading this you will feel as though you too can start building scale models of some of the nifty things that inspire you, and that this may lead you to build marvelous new things to put in the world.
Acknowledgments
Without the exciting Third Grade Bridge Project and support and encouragement of the marvelous faculty, staff, and parents of students of Bridlemile Elementary in the Portland Public School system, this particular adventure might not have happened. Special thanks to Mary-Ann for support, encouragement, and feedback, to Ellie for working through this with me, and to Ellen Pippenger for help making this more presentable.
Furthermore, let me express my sincerest thanks to Kathy Narramore, Natasha Dudley Busick, Alysa Williams, J.J. Morrow, and the 5th grade students at Oregon Episcopal School for helping to work through all this.
Table of Contents
1 Comparing Lengths
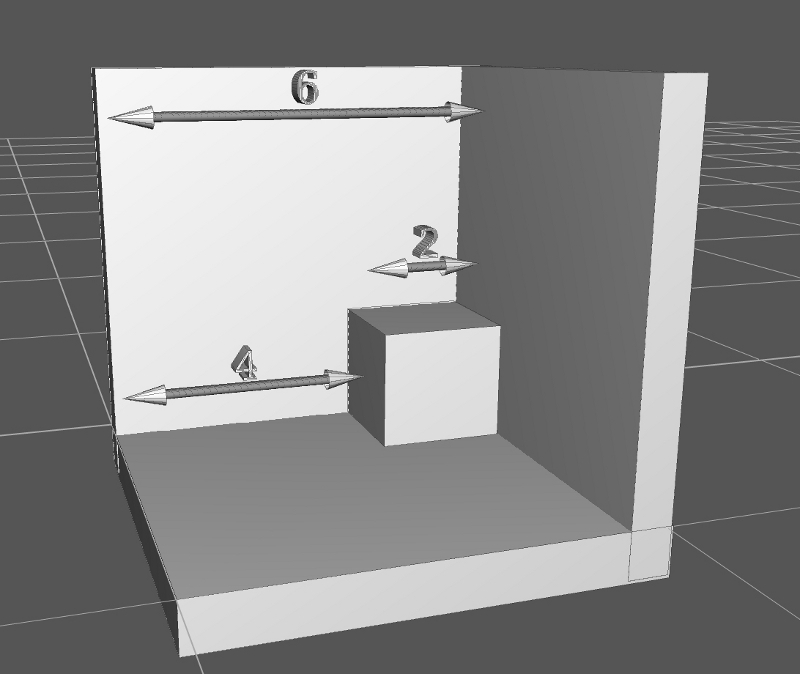
There are two fundamental ways to compare lengths. The first tells which length is larger in an absolute sense: we use subtraction to find the difference. For example, we know that a 2-inch cube will fit into a 6-inch cubic box with 4 inches to spare in each of the 3 dimensions, since 6 − 2 = 4.
We call this an absolute comparison↓ because a 4-inch difference could equally well apply to how much longer than your 4-inch pocket your 8-inch pencil is.
The other fundamental way to compare lengths uses division. The ratio↓ of two numbers is one number divided by the other. We form the ratio of two lengths to find the relative sizes of the lengths. This tells us how many times bigger or smaller one length is in terms of the other. Using our box and cube example we can see that 3 cubes will fit into the box in each dimension, because
62 = 3⋅21⋅2 = 31⋅22 = 3⋅1 = 3
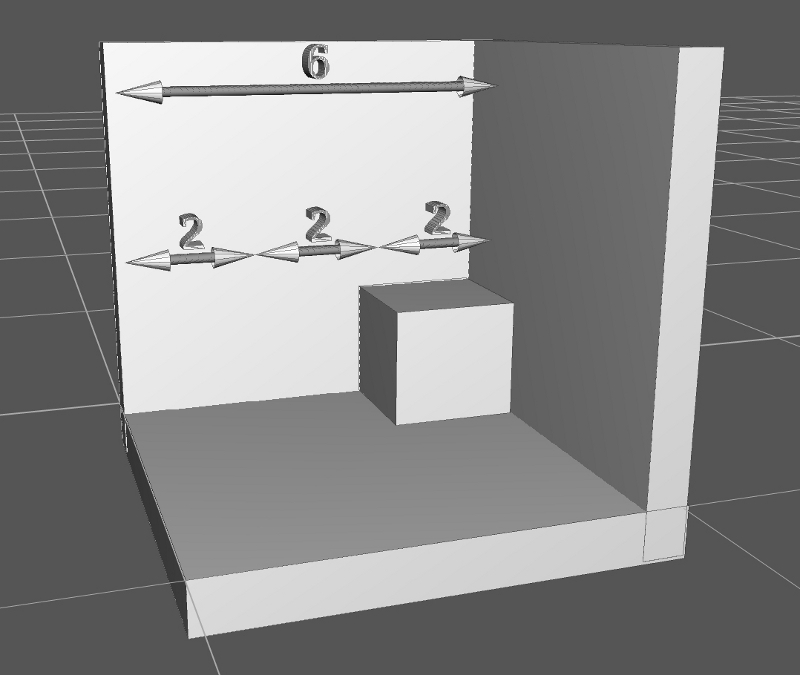
This is a relative comparison↓ because it gives an answer in terms of the size of the cube: the box is 3 cubes long in each dimension. It definitely does not apply to the pencil and pocket where the pencil is 2 times bigger than the pocket.
Another way to think of a relative difference is as a scale factor↓↓. We would have to scale (or multiply) the cube by a factor of 3 to make it as big as the box:
2⋅3 = 6
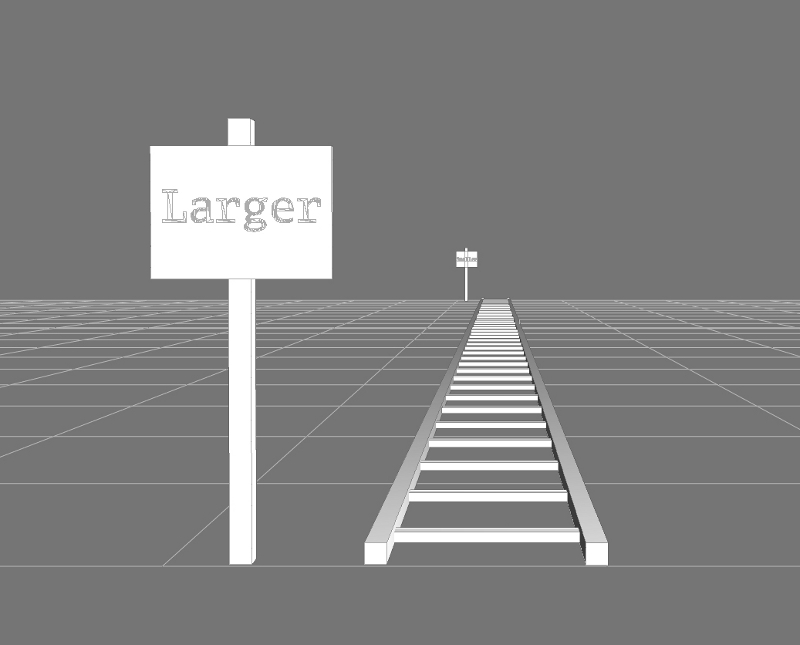
As another example, suppose we have a small model train and track that looks quite similar to a real train and track. Perhaps we are using it to make a movie, and we now want to add a bridge. Furthermore, suppose we have a particular bridge in mind. Then we could make a model bridge like the real one, but we need to know how to scale the real one down to the model size. We would need to know the scale factor. Suppose that the model is 5 times smaller than, or 1/5 the size of the real thing. Then we can write:
model_length = 15⋅real_length
An equation is like a balance with both sides having equal weight. As long as we do the same thing to both sides to keep things balanced, the equation remains true. For example, we could add 2 to both sides, or we could subtract 1 from both sides and the equation remains true. If we add the left hand side to itself and the right hand side to itself the equation remains true. This would be the same as multiplying both sides by 2. Or we can multiply both sides of this equation by 5 to get:
model_length⋅5 = 5⋅15⋅real_length
Now, since five fifths (5⋅1 ⁄ 5) is just 1, and multiplying any number by 1 leaves the number unchanged, this is the same as saying that the real bridge is 5 times bigger than the model:
model_length⋅5 = real_length
Try the following exercises before we talk more about scaling in Chapter Two.
1.1 Exercises
-
Compare the following lengths using subtraction to find the difference:
Length 1 Length 2 Length 1 - Length 2 12 3 21 7 24 8 10 5
-
Compare the following lengths using division to find the ratio:
Length 1 Length 2 Length 1 / Length 2 12 3 21 7 24 8 10 5
-
If a 55-inch line of dominoes stacked end-to-end is made from 22 dominoes, how long is each domino?
- Sometimes it is helpful to see the same ratio as a simple fraction, a compound fraction, and a decimal number. For example, the ratio of 42 and 16 make the simple fraction: 218, the compound fraction 258, and the decimal 2.625. Find the simple fraction, compound fraction, and decimal for the ratio 30/16.
- If an 8.5 x 11-inch sheet of paper is made up of 4 photos arranged in 2 rows and 2 columns, how big is a single picture? What scale factor would print one of the 4 photos as a whole sheet of paper?
2 Scaling
A factor↓ is a number in a multiplication. When we talk about scaling↓ something we mean multiplying it by a number we call the scale factor↓↓. We write this as the scaling equation↓↓:
new_length = old_length⋅scale_factor
When the scale factor is greater than 1, the scaling is an expansion or magnification and the new length is bigger than the old length. When the scale factor is less than 1, the scaling is a contraction or minituraization and the new length is smaller than the old length.
We can solve the scaling equation for the scale factor by dividing both sides of the equation by old_length:
new_lengthold_length = old_length⋅scale_factorold_length
Next, since anything times 1 is just itself, we’ll replace the old_length in the denominator on the right hand side with old_length⋅1:
new_lengthold_length = old_length⋅scale_factorold_length⋅1
Separate the right-hand side into the product of two fractions:
new_lengthold_length = old_lengthold_length⋅scale_factor1
And, since any number divided by 1 is itself:
new_lengthold_length = old_lengthold_length⋅scale_factor
Since any number divided by itself is 1, we don’t even have to know what old_length is to simplify further:
new_lengthold_length = 1⋅scale_factor
Finally, since any number times 1 is itself, we have the scale factor equation↓↓↓:
This tells us that a scale factor is a ratio: the new length over the old length. Even though we could perform the division (see Chapter Five), for convenience we will often use different units for new lengths and old lengths and the scale factor will be more useful in its undivided form.
new_lengthold_length = scale_factor
This tells us that a scale factor is a ratio: the new length over the old length. Even though we could perform the division (see Chapter Five), for convenience we will often use different units for new lengths and old lengths and the scale factor will be more useful in its undivided form.
We’ve used our knowledge of multiplication, division, and fractions to get this far and gone over the calculations in detail to get here. From now on we’ll use a common abbreviation for this calculation, skipping all but the first and final of the last 6 equations and just go from
old_length⋅scale_factorold_length 0to0 scale_factor
in one step. We’ll say that the old_length in the numerator and the denominator cancel.
Now lets move on, and think about scaling objects. When all parts of an object expand or contract by the same amount, we can equate the ratios for different parts because they have the same scale factor:
new_length1old_length1 = scale_factor = new_length2old_length2
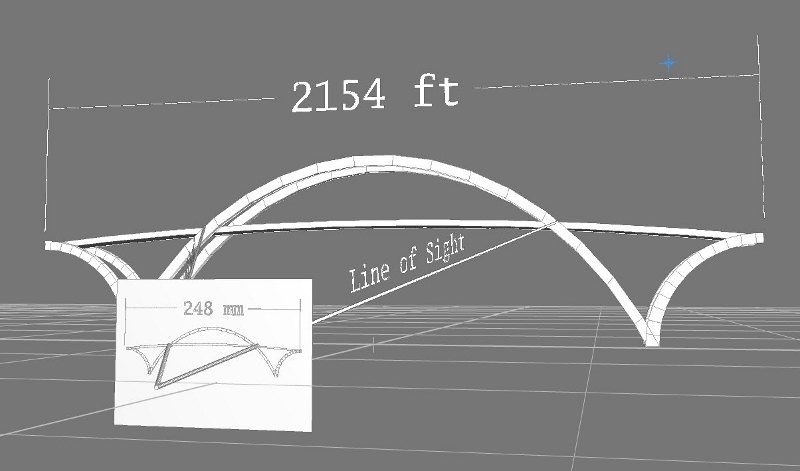
If we know the size of one part before scaling and the size of the same part after scaling, we can use this to find the sizes of the other lengths. For example, if we have a good photo of a bridge and know the length of the bridge, we can find real part sizes from the photo. Bridge sizes are often given in feet, so we’ll use feet for real-life bridge measurements. It will be easier for us to measure photo lengths in millimeters. Suppose the length of the bridge is 2,154 feet, and this length in the photo is 248 millimeters.
Let’s start by finding the scale factor from the photo to the real bridge from our scale factor equation. Since the new length will be the real sized length and old length will be the one in the photo, we can write:
scale_factor = real_lengthphoto_length = 2154 ft248 mm
Now let’s check this by scaling the length of the bridge in the photo by the scale factor:
248 mm⋅2154 ft248 mm = 2154 ft
All is well: 248 mm cancels↓ and we are left with the expected answer that the photo bridge length times the scale factor gives the real bridge length. This is how we use the scale factor to find lengths on the real bridge from lengths in the photo (try it in exercise ↓):
real_length = photo_length⋅2154 ft248 mm
This only works when when all the parts of the real bridge scale by the same amount in the photo. In order for this to work well, you have to take the picture so that:
- Your line of sight is straight on (perpendicular to both the length and height of the bridge)
- Your line of sight is to the bridge center
- You are far enough away from the bridge
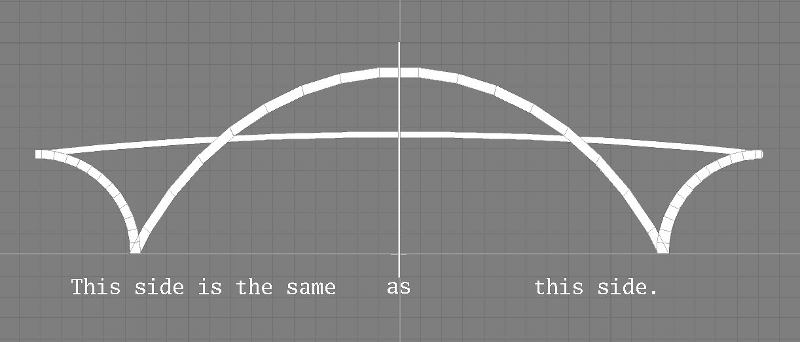
If you take the picture from one side of the bridge, that side will be close to you and the other will be farther away. In this case, the side closer to you will be bigger in the photo and the other side will be smaller — they will have different scale factors.
Notice that the half-arch on the left takes up about half the height of the figure, but on the right the half-arch takes up less than one third. This happens because we see in such a way that the farther something is away, the smaller its size in an image.
This is why if the ends of the bridge are different distances from where you take the photo, the farther end will be smaller in the photo (have a smaller scale factor) and the closer end will be bigger (have a bigger scale factor). If the distances to the ends differ too much, the scale factors will differ too much and you cannot equate them as we did above.
Similarly, if you get too close to the bridge, the center will be bigger, the ends will be smaller, the scale factors will be different, and again you cannot equate them. Also, the bridge might not fit into the photo unless you have a special (wide-angle) lens which gives different scale factors across the photo.
Now let’s use our scale factor to find a bridge length that we don’t already know from a measurement of the photo. For example, suppose we measure the distance on the photo between the bridge pylons as 110 mm.
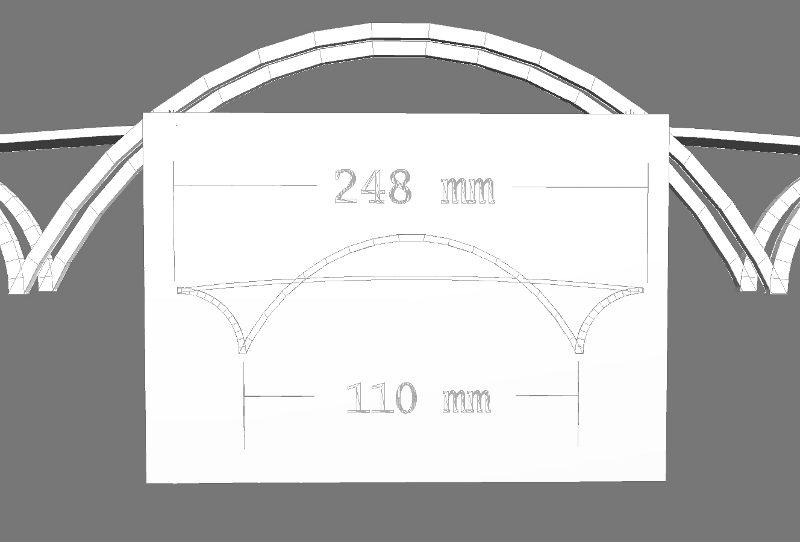
Now multiply by the scale factor to calculate the distance between the pylons in the real, full-sized bridge:
110 mm⋅2154 ft248 mm = 236940 ft248 ≈ 955 ft
since 00
00 and 00
00.
| 2154 |
| × 110 |
| 21540 |
| 215400 |
| 236940 |
| 955.4 |
| 248)236940.0 |
| 22321.00 |
| 13740.0 |
| 12400.0 |
| 1340.0 |
| 1240.0 |
| 100.0 |
| 99.2 |
| 8 |
Notice that we cancelled↓ the mm (millimeters) just like a number. Calculations in engineering and physics often carry along the measurement units in the calculation in order to help check that the answers make sense. In our case, we expected to get a real length which we are measuring in feet, and our answer is in feet, just as we expected.
Also notice that by carrying out the division to the tenths decimal place allows us to round the result of 955.4 ft to the whole number and say that real length is approximately↓ 955 feet. That’s why we use the mathematical symbol ≈ for approximate equality rather than an equals sign.
Another way to get a feeling for this calculation is to rearrange it into a, perhaps, even more meaningful configuration of numbers. Before we do this let us first note that:
2⋅37 = 37 + 37 = 67 = 27 + 27 + 27 = 3⋅27
since three 2’s is the same as two 3’s (2⋅3 = 3⋅2). Similarly, we have
110 mm⋅2154 ft248 mm = 110 mm248 mm⋅2154 ft
with the fraction 110 mm ⁄ 248 mm representing the fraction of the bridge corresponding to the distance between the pylons, and the expression on the right hand side representing the fraction of the real bridge length corresponding to the distance between the pylons.
The following exercises will give you a chance to practice forming and working with scale factors before we start using them in Chapter Three.
2.1 Exercises
-
Suppose you have a globe of the Earth that is 12 inches in diameter. Now suppose you find out that the diameter of the Earth is really about 8,000 miles.
-
Write down the scale factor from the globe to the full-sized Earth.
-
Write down the scale factor from the Earth to the globe.
- Suppose that the North American continent measures about 4 inches across. What does this scale to for the full-sized Earth?
-
Write down the scale factor from the globe to the full-sized Earth.
- Suppose you take a picture of the Eiffel Tower from the ground, print the picture as an 8.5 x 11-inch photo, and make a model from the measurements in the photo. Will the top of your model be smaller than it should be, larger than it should be, or just the right size? Why?
-
Suppose you take a trip over the summer to the Dryden Flight Research Center at Edwards Air Force Base in California and take a picture of a NASA shuttle. The next year in school you decide to build a scale model of the shuttle from your picture for a Science Fair project. You print the picture so that the shuttle is 250 millimeters long. The real shuttle is 56.14 meters long. You want your model to be 50 centimeters long.
-
What is the scale factor from the photo to the full-sized space shuttle?
-
What is the scale factor from the photo to the model?
-
If the nose section (including the cockpit) measures 57 millimeters in the photo, how large should you make it in your model?
-
If the diameter of an engine exhaust port is 16.5 millimeters in your photo, how long should it be in your model?
-
What is the scale factor from the photo to the full-sized space shuttle?
-
What do we need to do to change:
into: ?
3 Using a Photo to Calculate Model Sizes
Just as we used a photo to find lengths for the real bridge, we can use it to find lengths for a model bridge that we want to build. First, we’ll need the scale factor from the photo to the model. We can get this from the scale factor equation from Chapter Two:
scale_factor = new_lengthold_length
We also saw there that the size of the bridge in the photo is 248 millimeters, so all we need now is the size we want it to be in the model. Suppose we want our model to be 30 inches long. In this case, we plug in 30 inches for the new length and 248 millimeters for the old length to get the scale factor from the photo to the model:
30 in248 mm
Now suppose we wish to find a distance m in the model for some distance p in the photo. Then, using the scaling equation, we scale the photo distance p by the photo to model scale factor:
m = p⋅30 in248 mm
Let’s use this to find the distance between the pylons in the model. Remember from the last chapter that distance is 110 millimeters the photo. In this case, the value for p is 110 mm and we find the corresponding model length as:
m = 110 mm⋅30 in248 mm
= 110⋅30 in248
= 3300 in248
≈ 13.31 in
= 110⋅30 in248
= 3300 in248
≈ 13.31 in
since 00
00 and 00
00.
| 110 |
| × 130 |
| 3300 |
| 13.30 |
| 248)3300.00 |
| 2481.00 |
| 820.00 |
| 744.00 |
| 76 01 |
| 74 41 |
| 1 60 |
Notice that, again, just as in the calculations at the end of Chapter Two we cancelled↓ the mm just like a number. Also, notice that there is a remainder in the division at first of 76, but again, we keep going for more decimal places (carry down 2 zeros beyond the decimal point) to get the quotient 13.30 with a remainder of 160 hundredths (also known as 1.60). We then round the answer to 13.31 (since 160 is more than half of 248) and say that the length is approximately↓ ( ≈ ) 13.31 inches.
We can use this same sort of calculation to find other lengths in the model from lengths in the photo. Sometimes, numbers like 13.31 are called decimals↓ or decimal numbers because they contain a decimal point. Most of the calculations of model sizes will result in decimals. In Chapter Four we’ll find out how to convert these decimal lengths into marks on a ruler so that you can actually make the parts to size.
3.1 Exercises
- Suppose that the height of the tallest vertical support is 24 mm in the photo. How tall should you make it for the 30-inch model?
- If the height of the bridge above the water in the photo is 20.5 mm, how high above the water should it be in the 30-inch model?
- Suppose that the distance between vertical supports is 5.25 mm in the photo. What should the spacing be in the 30-inch model?
4 Converting Decimals into Fractions
To build a model, we’ll need to construct pieces to length. One of the best ways to do this is with a ruler or (for longer distances) a tape measure. When making a model to scale, we’ll need to translate calculations into measurements we can find on a ruler. To reduce the errors, we’ll use a ruler with small divisions: 32 per inch. In this case we’ll need to translate some of the decimals↓ we calculated from the scaling equation (like we did in Chapter Three) into some number of inches plus some number of 32ndths. One way to do this is to calculate the decimal numbers for 32ndths of an inch to 5 decimal places.
Let’s start with 0 ⁄ 32. Since this is 0, if we break this down into a decimal number we have: zero 1s, zero 10ths, zero 100ths, zero 1000ths, zero 10000ths, and zero 100000ths. We write this as: 0.00000. Now find 1 ⁄ 32 to 5 decimal places using long division:
| 0.03125 |
| 32)1.00000 |
| 0.10000 |
| 1 01000 |
| 01000 |
| 1 00100 |
| 96100 |
| 4010 |
| 3210 |
| 801 |
| 641 |
| 160 |
| 160 |
| 0 |
Thus, 1 ⁄ 32 = 0.03125. Next, add this to itself to get the decimal number for 2 ⁄ 32:
| 0.03125 |
| + 0.03125 |
| 0.06250 |
We can continue adding in this way to fill in the following tables:
| 32ndths | Fraction | Simplified | Decimal |
| 0 | 0/32 | 0 | 0.00000 |
| 1 | 1/32 | 1/32 | 0.03125 |
| 2 | 2/32 | 1/16 | 0.06250 |
| 3 | 3/32 | 3/32 | 0.09375 |
| 4 | 4/32 | 1/8 | 0.12500 |
| 5 | 5/32 | 5/32 | 0.15625 |
| 6 | 6/32 | 3/16 | 0.18750 |
| 7 | 7/32 | 7/32 | 0.21875 |
| 8 | 8/32 | 1/4 | 0.25000 |
| 9 | 9/32 | 9/32 | 0.28125 |
| 10 | 10/32 | 5/16 | 0.31250 |
| 11 | 11/32 | 11/32 | 0.34375 |
| 12 | 12/32 | 3/8 | 0.37500 |
| 13 | 13/32 | 13/32 | 0.40625 |
| 14 | 14/32 | 7/16 | 0.43750 |
| 15 | 15/32 | 15/32 | 0.46875 |
| 16 | 16/32 | 1/2 | 0.50000 |
| 32ndths | Fraction | Simplified | Decimal |
| 17 | 17/32 | 17/32 | 0.53125 |
| 18 | 18/32 | 9/16 | 0.56250 |
| 19 | 19/32 | 19/32 | 0.59375 |
| 20 | 20/32 | 5/8 | 0.62500 |
| 21 | 21/32 | 21/32 | 0.65625 |
| 22 | 22/32 | 11/16 | 0.68750 |
| 23 | 23/32 | 23/32 | 0.71875 |
| 24 | 24/32 | 3/4 | 0.75000 |
| 25 | 25/32 | 25/32 | 0.78125 |
| 26 | 26/32 | 13/16 | 0.81250 |
| 27 | 27/32 | 27/32 | 0.84375 |
| 28 | 28/32 | 7/8 | 0.87500 |
| 29 | 29/32 | 29/32 | 0.90625 |
| 30 | 30/32 | 15/16 | 0.93750 |
| 31 | 31/32 | 31/32 | 0.96875 |
| 32 | 32/32 | 1 | 1.00000 |
Notice how we also filled in the simplified fractions for even numbers of 32ndths. Since factors of 2 will cancel↓ one or more times to give denominators of 16, 8, 4, 2 and 1, even numbers of 32ndths reduce to fractions with smaller denominators. For example:
2832 = 2⋅142⋅16 = 1416 = 2⋅72⋅8 = 78
We can now use these tables to convert a decimal number of inches into the nearest number of 32ndths of an inch. For example, let’s look up the 13.31 inches that we calculated as the distance between the pylons for the model bridge in Chapter Three. First notice that we have 13 inches plus the fractional part .31. We look up the fractional part by scanning down the rightmost column of the table. We can see that .31 is between 0.28125 and 0.31250. Now, the difference between 0.28125 and .31 is 0.02875, but the difference between .31 and 0.31250 is just 0.00250, so .31 is closest to 10/32. That means that 13.31 inches is closest to 13516 inches.
Once you get the hang of this, you might not even need to do the subtractions, you’ll just be able to see that your number is closer to one row than the next. For example, because .31 and 0.31250 differ starting out in the 1000ths place, the difference must be less than a single 100th. On the other hand, 0.28125 and .31 differ by 3 in the 100ths place (a difference of 1 in the 10ths place does not tell us enough). This means that the numbers differ by more than two 100ths, so that 0.31250 must be closer.
Of course, you can also use the table to convert a number of 32ndths to a decimal representation by just looking up the decimal representation part corresponding to the fraction. For example 4732 is 4 plus the entry 0.21875 for 7/32, so 4.21875.
Try the following decimal conversion exercises before we move on.
4.1 Exercises
-
Using the tables of 32ndths in this chapter, find the nearest number of 32ndths to:
-
0.28250
-
0.34343
-
0.85937
-
0.28250
-
Complete the following table:
8ths Fraction Simplified Decimal 0 0/8 0 0.000 1 1/8 1/8 0.125 2 2/8 3 3/8 4 4/8 5 5/8 6 6/8 7 7/8 -
Use the table in exercise ↑ to convert 3.213 into a whole number and the nearest number of 8ths.
-
Use long division to find 1/16 to 4 decimal places.
-
Notice that we had to divide 1/32 to 5 decimal places to get a remainder of zero, 1/16 to 4 decimal places, and 1/8 to three decimal places. How many decimal places do you think we’d have to divide 1/64 to, in order to get a remainder of zero?
-
Can you explain the answer above by factoring the fraction denominators and multiplying by 10 for each decimal place? Start by filling in the rest of this table:
Fraction Factored 10’s Needed Associated Fraction to Cancel 2’s Decimal 1/2 1/2 10 Tenths 1/4 1/(2⋅2) 10⋅10 Hundredths 1/8 1/16 1/32 1/64
How many hundredths is 1.00?
How many hundredths is 1/4? - What can you say about the pattern in the 32ndths tables of the simplified fractions and the number of zeros at the end of the decimal representation?
- Use the model-to-bridge scale factor 2154 ft30 in to convert 0.03125 inches into feet (or you can use 1/32 inches if you prefer). If we have an error in our model of 1 ⁄ 32 of an inch, what size error is it in the real bridge?
5 Measurement Spaces and Conversions
You may have noticed that in our bridge example so far we have been using three different units for measuring lengths. For lengths of the real bridge, we have been using measurements in feet (ft). For lengths in the photo we have been using millimeters (mm). For lengths in the model we have been using inches (in). This has led to scale factors like:
2154 ft248 mm0000and000030 in248 mm
The units have been helping us check that our calculation make sense and keep track of whether a length applies to the photo, model, or the real bridge. However, perhaps we’d like to know how many times smaller the photo is than the real bridge. We’d like a scale factor that is just a number with no units (no ft, or mm), just like the scale factor 3 we found back in Chapter One where it meant the box was 3 times bigger than the cube. We’ll call this a unitless scale factor↓↓.
Start with the scale factor that converts photo measurements to real bridge measurements:
2154 ft248 mm
We have to convert 2,154 feet into millimeters so that the units cancel, and then we can perform the numeric division. Canceling↓ the units is necessary to get a scale factor that reduces to a unitless number (a number without units). Let’s proceed by converting 2,154 feet to millimeters. We’ll need to start with the following list of equivalent measures↓ expressed as equations:
1 ft = 12 in
1 in = 2.54 cm
1 cm = 10 mm
1 in = 2.54 cm
1 cm = 10 mm
Next we’ll change these into conversion factors. A conversion factor↓↓ is a scale factor that has the value 1 and is written as a fraction with some number of units above some number of other units. This way, when we multiply by the conversion factor, we are not changing the length, just the units. We’ll have an example of using a conversion factor after we form some from these equations.
Let’s first divide the feet-and-inches equation above by the left-hand side to get our first conversion factor:
1 ft1 ft = 12 in1 ft0000or00001 = 12 in1 ft
We can continue in this way, dividing each equation of equivalent measures first by the left-hand side, then by the right to get the following list of conversion factors:
1 = 12 in1 ft 000000000000 1 = 1 ft12 in
1 = 2.54 cm1 in 000000000000 1 = 1 in2.54 cm
1 = 10 mm1 cm 000000000000 1 = 1 cm10 mm
1 = 2.54 cm1 in 000000000000 1 = 1 in2.54 cm
1 = 10 mm1 cm 000000000000 1 = 1 cm10 mm
Now, let’s use the in ⁄ ft conversion factor to convert 2,154 feet to inches:
2154 ft⋅12 in1 ft = 2154⋅12 in = 25848 in
since | 2154 |
| × 0012 |
| 4308 |
| 21540 |
| 25848 |
Notice the ft cancel↓ leaving the answer in inches.
Fasten your safety belts for the next calculation!
Remember that multiplying by 1 leaves a number unchanged, so we can multiply by as many conversion factors as we need without changing the size (we only change the units). How many factors do we need? We just keep using the factors so that the units cancel↓ and we end up with the units we want. In our case, we want to convert 2,154 feet into millimeters so we start with a conversion factor that has feet in the denominator, and just keep chaining↓ them together so units cancel and we end up with millimeters in the numerator:
2154 ft⋅12 in1 ft⋅2.54 cm1 in⋅10 mm1 cm
Notice how ft, in, and cm all cancel↓ leaving only mm on top. We can also get rid of the 1s in the denominators, since dividing by 1, like multiplying by 1, has no effect. Our answer will be in millimeters:
2154⋅12⋅2.54⋅10 mm
Let’s multiply 2,154 by 12 to get 25,848 (as on p. ↑) and 2.54 by 10 to get 25.4 so we have:
25848⋅25.4 mm
Finally multiply 25,848 by 25.4 to get 656,539.2:
| 25848 |
| × M25.4 |
| 103392 |
| 1292400 |
| 5169600 |
| 6565392 |
| ^ . |
Notice that since there is one digit to the right of the decimal point among the two factors in this multiplication, we are careful to insert the decimal point so that there is one digit to the right in the final product. We have succeeded in converting 2,154 feet into 656,539.2 millimeters. We can now reduce the scale factor to a number. Since the units cancel, we need only perform the long division:
2154 ft248 mm = 656539.2 mm248 mm = 656539.2248
| 2647.3 |
| 248)656539.2 |
| 496100.0 |
| 160510.0 |
| 148810.0 |
| 11731.0 |
| 9921.0 |
| 1819.1 |
| 1736.1 |
| 83 2 |
| 74 4 |
| 8 8 |
This tells us that the real bridge is approximately 2,647 times bigger than the photo.
A similar calculation for the photo-to-model scale factor starts by converting 30 inches into millimeters:
30 in⋅2.54 cm1 in⋅10 mm1 cm
Again, notice how we chained↓ together the conversion factors, the first with inches in the denominator and the last with millimeters in the numerator. The other choice for the first conversion factor would have had inches in the denominator and feet on top, but that would not have helped us get to millimeters. Now since:
| 25.4 |
| × 1.30 |
| 7620 |
| ^ . |
this means we can calculate the unitless photo-to-model scale factor by substituting 762 millimeters for 30 inches as follows:
30 in248 mm = 762 mm248 mm = 762248
All that remains in order to reduce this to a unitless scale factor is to complete the long division:
| 3.07 |
| 248)762.00 |
| 744.10 |
| 18 00 |
| 17 36 |
| 64 |
The model bridge is approximately 3.1 times bigger than the photo. About how many inches is 248 millimeters? (Hint: 30 inches is about 3 times bigger than 248 millimeters.) How could we calculate how many times bigger the real bridge is than the model bridge? Take a minute and try to figure this out on your own before you read on.
Did you calculate the unitless scale factor for:
2154 ft30 in
by converting 2,154 feet into 25,848 inches and then dividing by 30 to get approximately 862? If so, here is another way.
We can use the unitless scale factors we already calculated. Since the real bridge is 2,647 times bigger than the bridge in the photo, let’s make a new unit called a photo-bridge (pb) and say that the real bridge is 2, 647 pb. Similarly, the model bridge is 3.1 pb. Now use the scale factor equation to calculate the scale factor from the model to the real bridge:
Rather than doing this the hard way, let’s shift the decimal points right in both numbers (multiply each by 10, leaving the ratio unchanged) before dividing:
2647 pb3.1 pb
The units cancel and all we need is the long division: | 3.1)2647 |
| 853.8 |
| 31)26470.0 |
| 24810.0 |
| 1671.0 |
| 1551.0 |
| 120.1 |
| 93.1 |
| 27 0 |
| 24 8 |
| 2 2 |
The real bridge is approximately 854 times bigger than the model. Wait a minute! That’s not the same answer we got a minute ago. What happened? Which answer is right?
Well, it turns out that neither answer is exactly right, but that 862 has less error. Recall how long division resulted in approximate answers, because we would stop a digit or two to the right of the decimal point and then round off the last digit of the quotient. It turns out that the 862 answer has only one of these approximations. However, the 854 answer has two such approximations (each of the pb numbers had one). Furthermore to get the 854 answer, we divide one approximate number by the other. This is where the error increased. Rather than dividing by 3.07, we divided by 3.1 which will go into 2,647 fewer times than 3.07 so the resulting quotient is smaller than it should be.
Let’s finish this up by saying that the real bridge is 862 times bigger than the model bridge. Approximately.
5.1 Exercises
- Convert 3 feet into millimeters.
- Convert 1 centimeter into 32ndths of an inch.
-
Use the fact that 1 m = 100 cm to:
- Write the conversion factor from meters to centimeters.
- Write the conversion factor from centimeters to meters.
- Convert 1 meter into inches.
- Convert the photo-to-full-sized space shuttle scale factor you found in exercise ↑(a) of Chapter Two into a unitless (p. ↑) scale factor. [Hint: one way to start is by converting 250 millimeters to to meters.]
- Is it possible to have one approximate number divide another approximate number and make the error smaller in the resulting number than in either approximation? Explain.
- How can you find out exactly how much bigger than the model the real bridge is? [Hint: What sort of number must the scale factor be?]
6 Symmetry and Organization
Many times, the object you are modeling has a symmetry that can help you reduce the amount of work you have to do measuring and organizing parts of the model.
For example, many airplanes, automobiles, trucks, boats, bridges, and buildings look to a large degree the same on the left side as they do on the right. This is called bilateral symmetry↓ (“bi” meaning two and “lateral” meaning side). By only measuring one side and making two of everything, you reduce the planning, measuring, and organizing of the model by a factor of two:
Some objects have two independent symmetries and you can use them both. For example, many bridges (or large sections of them) have two bilateral symmetries↓. If we were to look down on a bridge from overhead, this might look like this:
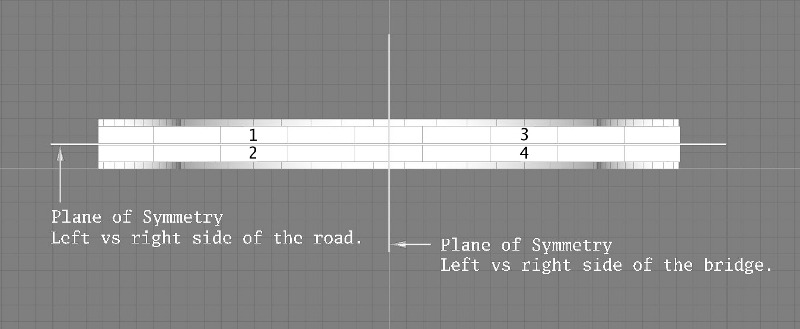
You can see that the vertical line divides bridge into left and right halves and that horizontal line divides the bridge into left and right sides of the road. Together, these two lines divide the bridge into 4 similar pieces. This helps reduce the planning, measuring, and organization of the project by a factor of 4. More specifically, suppose that the bridge has many vertical supports that help give it its shape:
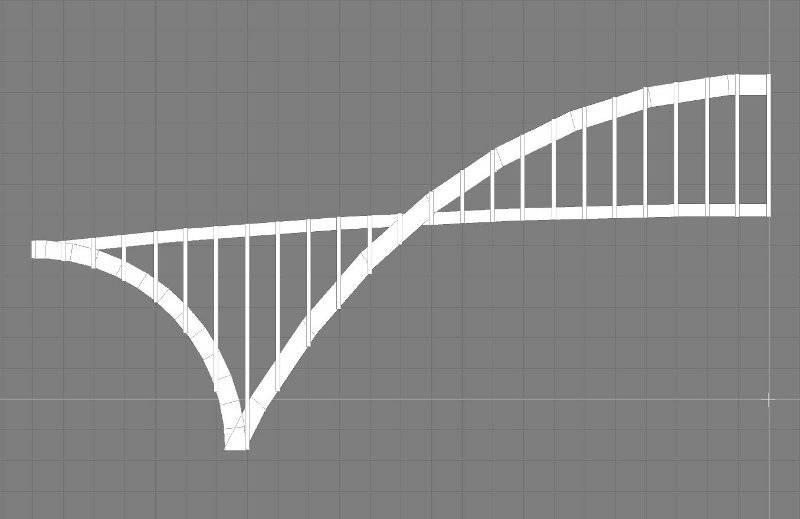
Then, rather than having to measure, convert, and keep track of all 98 vertical supports (24 + 1 + 24 + 24 + 1 + 24), we could just concentrate on the ones on the left half of the road (24 + 1 + 24) on the left side of the bridge (24 + 1), making 4 copies of each support (except we’d need only 2 copies of the ones right in the middle).
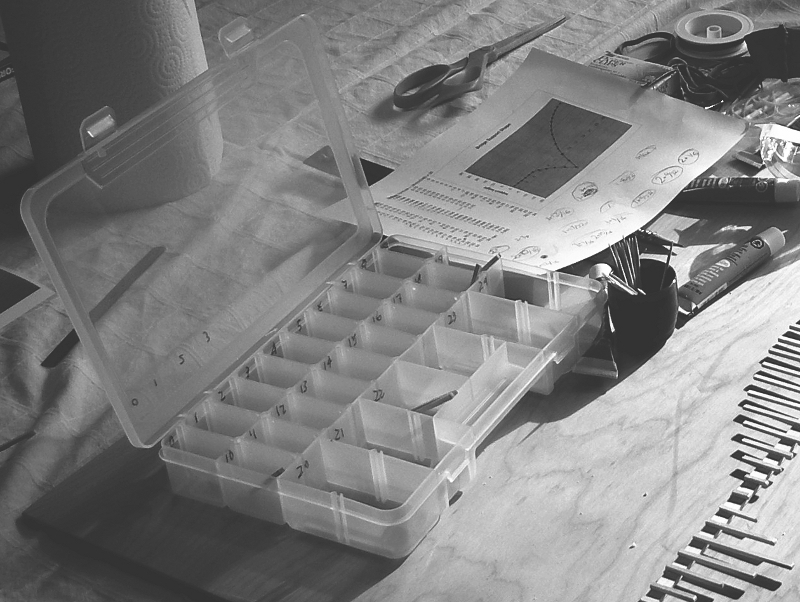
A good way to keep these organized is with a short, wide plastic container that has a bunch of compartments inside. Sometimes you can find these in a hardware store. Label each compartment with a number, then make and store 4 of the supports in each compartment:
For something like a bridge that has all these various vertical supports, it helps to organize the measurements and automate the conversions by entering them into a spreadsheet. If you do this, you can then plot the measurements and visually check that everything looks right before you have to cut and waste any material:
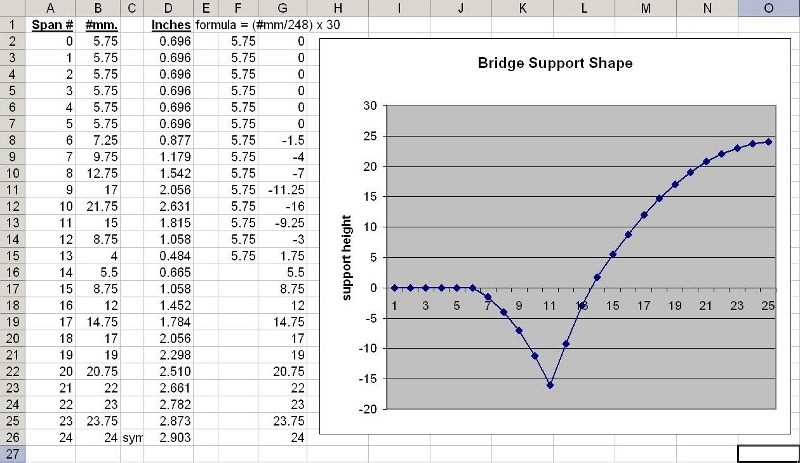
It also makes it easier to adjust measurements that are off just a bit, since you’ll be able to see if a support is too high or low and adjust the number until it looks right.
Using symmetry to simplify a problem is one of the most important tools that scientists and engineers have, and they use it frequently to get answers or understand things that otherwise are too complicated to undertake. Use it whenever you can.
7 Putting It All Together
Here is a short summary of how to build a scale model:
- Decide which object to model.
- Take a good photo (or photos) of the object and find the real length of something in each photo.
- Decide on the size of your model.
- Figure out the scale factor from each photo to the model.
- Determine if you can, and if so, use symmetry to reduce the modeling task.
- Measure the object components from the photo(s) and organize them (into a spreadsheet).
- Convert the photo measurements to the model size using the photo-to-model scale factor(s) and check the results for errors and consistency (if possible, graphing the results).
- Convert the model decimal measurements to ruler measurements and check the results for errors and consistency (if possible, graphing the results).
- Prepare object parts to the calculated model sizes.
- Construct the model from the parts.
That is about all I have to offer on building a model to scale. All you have to do now is decide what to build and how big to make it before you can get started. I’ve included references for a couple of books on related topics that you might find helpful and interesting. Happy building!
References
You may find the following books helpful for understanding better some of the ideas used in this pamphlet.
Alyece Cummings Painless Fractions, Barrons Educational Series, 2nd edition, 2006.
Lynnette Long Painless Algebra, Barrons Educational Series, 2nd edition, 2006.
Ernst Norling Perspective Made Easy, Dover Publications, 1999.
Index
absolute (comparison of lengths): ↑
cancel (number in a ratio): ↑, ↑
cancel (units in a ratio): ↑, ↑, ↑, ↑, ↑, ↑
conversion factor (chaining): ↑, ↑
factor (scale): ↑, ↑
relative (comparison of lengths): ↑
scale factor: ↑, ↑
Scale Model Building
If you want to learn how to make realistic models, this pamphlet is for you. In it we talk about comparing and scaling lengths, using a photo to calculate model sizes, and more. Take a look inside and see.
Copyright (C) 2009 Michael Ward